I haven't posted for awhile but the truck is working good. After getting it running life caught up with me and I haven't really done much since. I still use it several times a week around town but I haven't figured out my gauges yet, the dash needs to be reassembled, and other miscellaneous tasks remain uncompleted. I am hoping sometime in the near future I will be motivated enough to finish a few of these.
The only critical problem I am facing right now that gets in the way of using the truck is my 12 V battery. I have the Iota DLS-55 charger that is recharging my old 12 V battery from the main traction battery pack (144V pack) while I am driving. This was doing ok until I started noticing on long trips the battery would start to overheat and smoke (boiling). It isn't clear to me if this is the fault of the old battery, which came with the donor car, or that I am pushing too many Amps into it. I am worried it is the latter but went ahead and picked up a new 12 V battery to replace it. The new one is a much smaller battery made for a moped but because I am not running a starter the reduction in size should not cause any problems.
The best thing that happened since my last post was receiving my Illinois Green Fleets conversion rebate check from the Illinois Environmental Protection Agency. This is a program in Illinois that provides money back for 80% of your purchases made in the conversion of an ICE vehicle to an alternative fuel vehicle up to $4,000. I didn't go into this project expecting this rebate, although I did know it existed, but it was a wonderful surprise to see a check for $4,000 in the mail. I must admit that I felt a little guilty receiving this money from the State of Illinois knowing the financial trouble they are in. They have laid off over 50 teachers in my area due to funding issues but I didn't lose too much sleep over it. I figured if I wouldn't have received the money budgeted for the program some company probably would have.
Other updates: My melted battery fix is still holding without issues. The NetGain Controller's charger I am using has been working great. I don't have a 220 V plug yet in the garage so I haven't tested the chargers ability to do 220 yet. 110 works great!
Saturday, September 18, 2010
Sunday, March 14, 2010
Battery Terminal Repair
I was able to repair my melted battery terminal. My terminal type has a bolt section that connects to the main post that runs into the battery.  The bolt section was complete toast after the meltdown but thankfully the main post area remained mostly unscathed.
 Above shows my melted terminal, note bolt fell out after failure.
The plan for the repair was to tap a hole into the main post and bolt my 2/0 connecting wire to it. To help me with this I purchased a cheap tap and die set from Amazon for $35. I have never attempted to tap threads into anything before so I practiced several times on wood and then a scrap piece of metal I had around. The process was relatively easy to accomplish as it only consists of drilling a 5/8" hole deep enough for the bolt and then using the tap tool to create the threads.
 Above is the thread tap tool I used from my set.
 Here is the hole I drilled being very careful not to drill too deep into the battery as I had no idea how far the post went down. Thankfully I didn't hit any internal parts of the battery and had enough room for my bolt to tighten with the battery cable connector in place.
  This picture shows the tap tool inserted and turned a few times into the hole. I was careful to turn it slowly and backed it out several times to remove any shavings from the bottom so they wouldn't get in the way of the tap preventing the threads from going all the way down to the bottom. Turning the tap into the lead was much easier than the scrap piece of steel I practices on.
 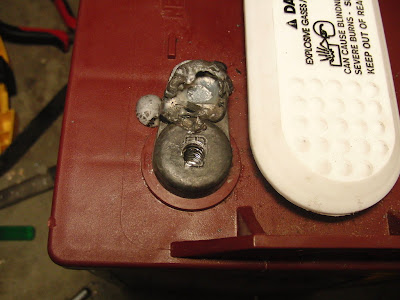 Here is the finished tapped hole. You can see the threads in there if you look closely.
I was concerned that the malleability of the lead was going to cause my newly tapped threads to be stripped when I tried to screw the bolt into it but that wasn't a problem. I was careful tightening the bolt and will continue to be careful when I work with this particular battery in the future. Overall I think the repair went well. Spending the $35 for the tools is much better than spending $100+ for complete replacement battery and I get to add to my tool collection ;). Only time will tell if this repair will last but so far so good. After I was done I took it for a test drive and it held up nicely.
 The bolt section was complete toast after the meltdown but thankfully the main post area remained mostly unscathed.
 Above shows my melted terminal, note bolt fell out after failure.
The plan for the repair was to tap a hole into the main post and bolt my 2/0 connecting wire to it. To help me with this I purchased a cheap tap and die set from Amazon for $35. I have never attempted to tap threads into anything before so I practiced several times on wood and then a scrap piece of metal I had around. The process was relatively easy to accomplish as it only consists of drilling a 5/8" hole deep enough for the bolt and then using the tap tool to create the threads.
 Above is the thread tap tool I used from my set.
 Here is the hole I drilled being very careful not to drill too deep into the battery as I had no idea how far the post went down. Thankfully I didn't hit any internal parts of the battery and had enough room for my bolt to tighten with the battery cable connector in place.
  This picture shows the tap tool inserted and turned a few times into the hole. I was careful to turn it slowly and backed it out several times to remove any shavings from the bottom so they wouldn't get in the way of the tap preventing the threads from going all the way down to the bottom. Turning the tap into the lead was much easier than the scrap piece of steel I practices on.
  Here is the finished tapped hole. You can see the threads in there if you look closely.
I was concerned that the malleability of the lead was going to cause my newly tapped threads to be stripped when I tried to screw the bolt into it but that wasn't a problem. I was careful tightening the bolt and will continue to be careful when I work with this particular battery in the future.
 Overall I think the repair went well. Spending the $35 for the tools is much better than spending $100+ for complete replacement battery and I get to add to my tool collection ;). Only time will tell if this repair will last but so far so good. After I was done I took it for a test drive and it held up nicely.
Thursday, February 18, 2010
Battery Terminal Meltdown
First the good news. I have my headlights and turn signals working now. These were failing due to an disconnected grounding wire which use to connect to the ICE. I also have insurance and tags on my truck now so I have been taking it around town for some test runs.
Now the bad news. In one of my recent drives the traction pack failed and I coasted to a nearby parking lot. I don't have any meters yet so I initially thought my pack had been completely depleted but when I checked the front four batteries they still had juice. Unfortunately I don't have my lift bed working yet so it took me a bit of time to get the bed off to expose the rear batteries. Once the bed was off the problem was obvious. One of my battery terminals melted where the wire meets the post. I bypassed the problematic battery and drove the truck home. Here are some pics of the meltdown.


I researched what different battery terminal types are good for EVs prior to selecting these batteries and didn't see anything about staying away from low profile threaded terminals. I did see some posts saying the automotive style posts are the best but my battery provider didn't have this specific battery with that post available. I am hoping that this meltdown was caused by user error on my end around not having the bolt tight enough on the terminal and not an error in my judgment on the style of post I used. We will see if I have future failures then the latter might be true.
The battery doesn't seem to be ruined as it still tests good voltage. I am planning on tapping a new threaded bolt into the remaining post and putting it back into service.
Tuesday, January 19, 2010
Still working when I can
I apologize for not posting in a long time. Thankfully I have still been able to work on the truck as time permits. It hasn't progressed as quickly as I would have liked, due to other things taking my time, but it is still moving along. As a matter of fact, I went for a test drive around the block last weekend. There is still a lot to do but overall the test drive went great. I called it my mini-EV grin experience because it still isn't street legal. I have a call out to my insurance agent about covering the car and I need to visit the department of motor vehicles to get license plates.
Below are some recent pics of the project
 Above is my main board housing all my components. Items here include

My board has two tiers. This picture shows the second tier attached and it contains the controller, easy disconnect for wiring, and fuse box. I had to go with this stacked configuration because the charger was so large and I wanted to keep it in the car for remote charging away from home.

Here is a shot of my front battery boxes with some insulation around them. towards the back you can see my two main Anderson disconnects. One for traction pack (red) and one for motor connection (blue). I was pleased to see the different color Anderson connectors don't work together so it isn't possible to plug the red into the blue by accident. The white tube on the top right is my vacuum reservoir for the brakes. I made it myself out of PVC piping.
 Here is an updated shot of my rear battery box. It still isn't covered with the bed because I have had problems with my bed hinges holding the weight as I raise it. For now I am going to secure the bed to the truck using the original bolts and revisit the tilt bed later.
Below are some recent pics of the project
 Above is my main board housing all my components. Items here include
- Iota DLS-55
- Two Contactors
- Pot box w/ throttle attached
- Main fuse
- NetGain Controls Charger

My board has two tiers. This picture shows the second tier attached and it contains the controller, easy disconnect for wiring, and fuse box. I had to go with this stacked configuration because the charger was so large and I wanted to keep it in the car for remote charging away from home.

Here is a shot of my front battery boxes with some insulation around them. towards the back you can see my two main Anderson disconnects. One for traction pack (red) and one for motor connection (blue). I was pleased to see the different color Anderson connectors don't work together so it isn't possible to plug the red into the blue by accident. The white tube on the top right is my vacuum reservoir for the brakes. I made it myself out of PVC piping.
 Here is an updated shot of my rear battery box. It still isn't covered with the bed because I have had problems with my bed hinges holding the weight as I raise it. For now I am going to secure the bed to the truck using the original bolts and revisit the tilt bed later.
Subscribe to:
Posts (Atom)